 Save
Save I'll never forget the spring when my sister announced her graduation, and I found myself in the kitchen the night before the celebration, wanting to create something that would make everyone smile. While flipping through party ideas, I stumbled upon the concept of these little graduation cap snacks—crisp, colorful, and impossibly fun to make. It hit me that these tiny creations perfectly captured the joy of the moment: something simple yet celebratory, something you could hold in one hand while cheering for the graduate. Now, whenever I make them, I'm transported back to that kitchen, hands sticky with cream cheese, laughing at how such a small snack could bring such big happiness to a party.
I still remember my nephew's graduation party, watching his friends grab these snacks two and three at a time, not because they were hungry, but because they couldn't resist the whimsy. One girl carefully photographed each one before eating it, wanting to capture the moment. That's when I realized these weren't just snacks—they were little edible wishes for the future, shaped like the cap of accomplishment itself.
Ingredients
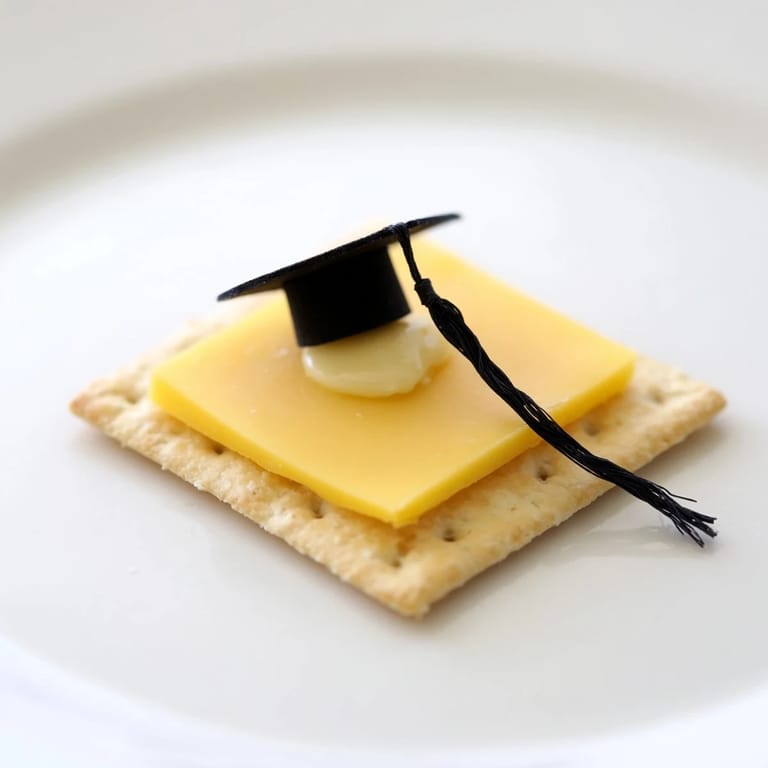
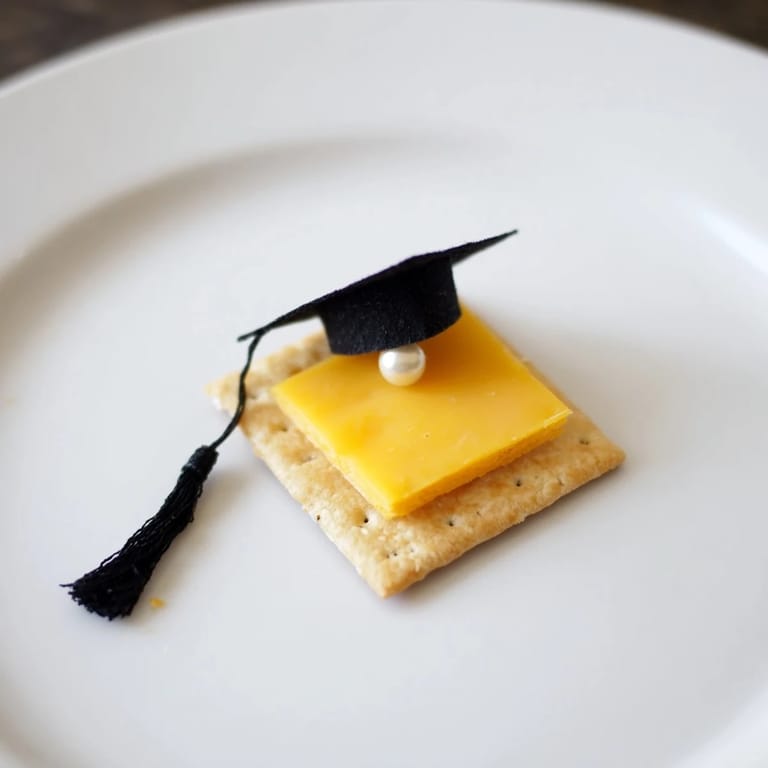
- Square crackers (12 total): These form the foundation of your cap, so choose ones that feel sturdy and substantial—Wheat Thins work beautifully because they're substantial enough to hold the cheese without breaking, but water crackers or whole-grain squares work just as well depending on what flavor story you want to tell with your snacks
- Square cheese slices (12 slices, about 1.5 inches): The cheese is your cap's crown, and here's where you can play—sharp cheddar gives boldness, Swiss brings subtle elegance, and American cheese adds nostalgic comfort; I like to use a mix if I'm making a bigger batch, letting different cheeses represent the diverse futures ahead
- Long strings of black licorice or dried fruit strips (12 strings, about 3 inches long): This is the tassel that makes the magic happen; I've found that black licorice holds its shape beautifully, but mango strips, apricot leather, or fruit roll-ups create stunning visual interest and add a natural sweetness that balances the savory base
- Cream cheese or hummus (small dabs for adhesive): Think of this as your edible glue—cream cheese works like a dream and tastes lovely, but hummus gives a earthier flavor and works especially well if some of your guests are dairy-free
- Candy pearls or raisins (12 pieces, optional but recommended): These tiny buttons at the tassel's end are what elevate these from cute to undeniably graduation-cap authentic; they catch the light and add that final celebratory sparkle
Tired of Takeout? 🥡
Get 10 meals you can make faster than delivery arrives. Seriously.
One email. No spam. Unsubscribe anytime.
Instructions
- Set up your edible workspace:
- Gather everything on a clean cutting board or large plate—your crackers in one pile, cheese slices stacked and ready, licorice or dried fruit strips arranged like soldiers, and your cream cheese or hummus in a small bowl with your spreading knife right there. This takes thirty seconds and saves you from frantically searching for ingredients mid-assembly.
- Build the foundation:
- Place each cracker square on your serving platter, leaving just a breath of space between them so they don't touch—they'll stay crisper that way. Now comes the satisfying part: lay a cheese square on top of each cracker, making sure the corners align perfectly. This creates that clean, cap-like silhouette that makes people gasp when they see them.
- Attach the tassel with intention:
- Take one of your licorice or fruit strips and position it at one corner of the cheese square. Using the back of your spreading knife or a small spoon, dab a generous amount of cream cheese or hummus onto that corner, then press the tassel end into it, holding it there for just two seconds. The adhesive will set almost immediately, and you'll feel that little moment of accomplishment each time one sticks.
- Crown your creation:
- If you're using candy pearls or raisins, this is the moment to place one at the end of the tassel where it naturally wants to drape. Add just a tiny dab of cream cheese under it to keep it secure. Step back and admire—each one really does look like a miniature graduation cap, complete with that ceremonial button.
- Complete the collection:
- Repeat this dance with the remaining crackers, cheese, tassels, and buttons. By the time you're halfway through, your hands remember the rhythm, and you'll move like you've been making these forever. Arrange them on your serving platter like they're standing at attention, ready to celebrate.
 Save
Save What I love most is watching someone's face light up as they realize what they're looking at—that moment of recognition when the whimsy clicks into place. These little snacks have a way of making any celebration feel more intentional, more thoughtful, more like you understood exactly what the occasion meant.
Making Them Your Own
The beauty of these graduation cap snacks is that they're a canvas for your creativity. I've made versions with sharp white cheddar and dried mango for a sophisticated twist, and others with mild Swiss cheese and bright red fruit leather for a bolder visual statement. Try pairing different cheeses with different tassel colors—they tell completely different stories on the same basic structure. Once you've made them once, you'll instinctively know what flavor combinations will make your particular celebration sing.
Adapting for Dietary Needs
Whether someone in your circle needs gluten-free crackers, dairy-free cheese alternatives, or options free from artificial ingredients, these snacks bend to meet your guests where they are. I've used gluten-free water crackers that work just as beautifully as their wheat-based cousins, and discovered that many dairy-free cheese options become wonderfully creamy when they're at room temperature. The adaptability is part of what makes them perfect for celebrations—they can include everyone, which is exactly what graduations are about.
Serving Suggestions & Party Timing
Arrange these on a platter about twenty minutes before your guests arrive—they'll stay fresh and crisp on the serving table for a good hour, which gives you plenty of grace period for a celebration that runs wonderfully off-schedule. Place them toward the edges of your platter so they're easy to grab, and consider putting out a small napkin stack nearby because people eat these faster than you'd expect, with enthusiasm and genuine delight.
- Serve them alongside other appetizers, or let them be the star of a snack-focused celebration where there are plenty to go around
- If your celebration includes time between events (like a ceremony and a reception), these are perfect because they're bite-sized and don't require sitting down or using utensils
- They pair beautifully with sparkling cider, lemonade, or whatever celebratory beverages you're serving—the salty-sweet combination always works
 Save
Save These little snacks have taught me that celebration is in the details—in a tassel that drapes just right, in a cheese square that sits perfectly square, in the time you take to make something special for people you care about. They're edible proof that the best party moments come from thinking like a friend who genuinely wants to make everyone smile.
Recipe Questions & Answers
- → What types of crackers work best?
Square crackers like Wheat Thins or water crackers provide a sturdy base and a crisp texture that complements the cheese.
- → Can I substitute the licorice tassel?
Yes, dried fruit strips such as mango or apricot can be used as colorful and flavorful tassels.
- → How do I keep the tassel attached?
A small dot of cream cheese or hummus acts as an adhesive to secure the tassel to the cheese square.
- → Are these snacks suitable for vegetarians?
Yes, they contain vegetarian-friendly ingredients like cheese, crackers, and fruit or licorice.
- → Can I make these gluten-free?
Using gluten-free crackers ensures the snack is suitable for gluten-sensitive guests without altering the flavor.